


As an SEO writer and content creator, I’ve tested out a ton of tools to grow my email list. Honestly, with so many options out there, picking the right one can feel pretty overwhelming.
At one point, I grew my newsletter on beehiiv to over 3,000 subscribers, but ended up doing a big cleanup, trimming it down to about 1,200 active subscribers.
Because let’s be real, keeping inactive subscribers doesn’t help anyone, right?
My email marketing adventure kicked off in 2020 when I launched my first newsletter using Mailchimp. A few years later, I switched to Kit (formerly known as ConvertKit) because it was more intuitive and had great features to help content creators like me grow their newsletters.
Even then, I was stuck at around 2,000 subscribers and couldn’t figure out how to make money writing newsletters without putting in a ton of extra work.
Then, beehiiv came along with some impressive monetization tools designed for creators (I dive deeper into those features in this article). I made the switch from Kit to beehiiv and haven’t looked back since!
In this beehiiv review, I’ll share what beehiiv.com is, my personal experience with the platform, how it works, and how to monetize a newsletter with beehiiv even with a 1,000 email list.
Additionally, I’ll show you how much I’ve made from the beehiiv Partner Program, boosts, and sponsored ads.
P.S. This post includes a few affiliate links. If you decide to try beehiiv, I might earn a small commission at no extra cost to you. Just being upfront about it! I’m only recommending tools I’ve used myself and truly believe in. 🙌
Register for a 30-day free trial and then use my code BEEHIIV2025 to get 20% off your first 3 months! 🚀
My personal experience with beehiiv
I made the switch from Kit (formerly ConvertKit) to beehiiv in January 2024.
The biggest reason?
Kit just didn’t have the monetization options I was looking for, while beehiiv made it a clear selling point.
As a content creator with a small email list, I needed a simple, low-effort way to make money from my newsletter.
Yep, you read that right. Running my SEO writing business full-time doesn’t let me pour tons of energy into a newsletter.
I didn’t want to hunt for newsletter sponsors. Instead, I wanted a setup where they’d come to me with offers. Plus, I was keen on promoting other newsletters to earn passive income without breaking a sweat.
So far, it’s paying off with beehiiv.
Beehiiv sends me 3 to 6 sponsorship opportunities every month, with sponsors compensating me based on clicks and views. On top of that, I’ve activated boosts for my newsletter, earning $1 to $3 for each referred subscriber.
I made a total of $940.32 from beehiiv Boosts and sponsored ads in 2024 with roughly a 1k email list.
And this doesn’t even include any product or service sales I’ve made through my newsletter.
This really is effortless cash I wouldn’t have made if I’d used any other email software. All I had to do was accept ad offers and insert those ads into my weekly newsletter.
Low effort, big return.
I promise, this isn’t me trying to brag.
I’m just sharing what’s possible for a small content creator using beehiiv.
Plus, I’ve made over $5,000 from the beehiiv Partner Program simply by talking about my experience with the platform. If you want more details, I cover that in the article, too.
beehiiv has definitely been a win for me this year, even though I put almost no effort into growing my email list. In August 2024, I even cut my subscriber list nearly in half, down to 1,200, to boost my performance stats. I set up an automation to remove inactive subscribers, which actually worked in my favor.
Here’s my most recent performance update from October 2024.
I send out newsletters every week, always aiming to bring more value to my audience, mainly SEOs and content creators. Looking at the performance data, there’s massive potential to grow and earn even more if I commit a bit more time to growing my email list.

I’ve had a pretty good experience with beehiiv, but let’s be honest: no platform is flawless. There are definitely some ups and downs.
Here’s what I’ve found are the key pros and cons of using beehiiv:
Pros of using beehiiv
- Tons of ways to monetize your content as a creator
- You can even make money from small email lists, starting at just 1,000 subscribers
- The option to build your own website and keep your content as blog posts—here’s my website on beehiiv as an example
- Detailed analytics reports that break down user acquisition and performance
- The ability to create a referral program to help grow your newsletter audience
Cons of using beehiiv
- The wide range of features can feel a bit overwhelming when you’re just getting started
- Ad requests might be completely irrelevant to your niche at times
- No option to send newsletters based on your subscribers’ time zones
- Building custom pages isn’t as intuitive as you might hope
- Setting up a freebie page with a subscription form can be tricky at first
- There’s no built-in integration with Gumroad
Those are the main pros and cons I’ve noticed from my experience. Even though the learning curve felt steep when I switched from Kit (which was simpler), I’m convinced I made the right choice.
The best part?
Beehiiv keeps getting better, rolling out new features and improving what’s already there at an impressive pace.
If you’re still on the fence about whether beehiiv is right for you, read his beehiiv overview—I’ve got more insights coming up.
What is beehiiv used for?
beehiiv is a newsletter growth platform launched in 2021 by Benjamin Hargett, Jacob Hurd, and Tyler Denk, who was formerly a product manager at Google.
The founders claim that the primary goal of the platform is to help you easily build, grow, and monetize your newsletter.

Beehiiv is positioned as “the most creator-friendly newsletters platform.” However, many other newsletter platforms also have a clear UI and powerful functionality.
So, what’s special about beehiiv?
Here is how Tyler Denk, the platform co-founder, explains it:

Beehiiv has been operating for four years and has already made so much buzz on the web and X (former Twitter) to attract novice and well-established creators.
Here’s who I believe will benefit from using beehiiv email software:
1. Beginners
If you want to start a newsletter from scratch and don’t want to invest any money at the beginning, you can use beehiiv. It’s free to use for up to 2,500 subscribers.
Additionally, you can send unlimited email campaigns and grow your newsletter for free with beehiiv’s recommendation network.
Paid plans start at $39/month and come with a 30-day free trial, which is enough to understand whether the tool works for you.
2. Creators with small email lists
I’ve already mentioned that beehiiv is free to start with.
However, if you already have an audience of up to 1,000 subscribers, you can start monetizing your newsletter with beehiiv’s ad program and boosts.
I’ve been making roughly $92 monthly on beehiiv in my first 10 months on the platform, which is absolutely realistic with a small email list.
3. Creators who don’t know how to monetize their newsletter
I’ve been such a creator for a long time because I didn’t have time to manage my newsletter properly and prepare salesy email campaigns.
I didn’t want to dig into details. Instead, I wanted to have quick and simple solutions to monetize my newsletter.
If you don’t offer any products or services to sell but still want to monetize your newsletter, you can do it hustle-free with beehiiv’s ad network and boosts (more about it later in this article).
4. Creators willing to switch but don’t want to lose all their setups
I know content creators who are open to switching to another email software, like beehiiv, but don’t want to set up their complex automations from scratch.
To my knowledge, beehiiv offers a smooth and quick transition for creators switching from Substack, Revue, WordPress, Ghost, and Mailchimp. If you manage a big email list, you can also reach out to the beehiiv’s support team and ask for custom assistance.
You can learn more about migrating your newsletter to beehiiv in this video:
How you can get started with beehiiv
It took me some time to learn beehiiv’s features and functionality. However, I’m honestly satisfied with their powerful toolkit for content creators.
Let me show you how beehiiv works and what I use it for.
As soon as you join beehiiv, you’ll be redirected to the dashboard, where you can see your subscribers’ statistics and the overall performance of your email campaigns for the last 30 days.
Below, you can see the number of active subscribers on my beehiiv account — 1,172 subscribers.
You can also see the average open and click rate from the past 4 weeks — 64.24% open rate and 3.5% click-through-rate.
All your published posts on beehiiv will be in chronological order in the top right corner. It’s very convenient if you want to quickly check them.
You can also see a beehiiv’s notification that I have one pending ad sponsorship request that I haven’t checked yet. The pop-up will remain until I accept the ad request or until it expires.
Overall, I use the beehiiv dashboard to quickly review my stats and the performance of my recent newsletters.

If you are new to beehiiv and wonder how to start, I recommend the following steps:
- Create a subscribe form to capture email addresses
- Create a beehiiv-hosted website to publish your newsletters
- Customize a website
- Create a newsletter template
- Customize a newsletter design
- Create a lead magnet page on beehiiv
- Set up automation
- Turn on beehiiv monetization
Does it sound like a lot of work?
Not really!
I spent several days moving my newsletter to beehiiv, creating landing pages for lead magnets, and setting up the automation.
Let me show you how to create a subscribe form on beehiiv.
Navigate to Audience → Subscribe Forms →Create a new form
You have to come up with the headline, write a description, create a call-to-action (CTA), and upload the logo. Besides, consider what you want your subscribers to see or do once they join your email list. You can show them a success message or redirect them to another page.
Once you are done, hit “Save.”

The beehiiv’s subscribe form design is very simple and has limited customization. You can change the button colors and copy.
However, that’s pretty much it. Anyway, it works well to capture new email addresses.
Beehiiv offers several types of forms depending on your needs: full width, fixed width, slim embed (email field only, without header, background, or description), and advanced configuration with attribution tracking.
You can embed it anywhere, including a website or Medium posts, which is an excellent opportunity to grow your email list.
Here’s what my beehiiv’s subscribe form looks like in action:
If you wonder, “How do I create a landing page on beehiiv?” Let me show you step-by-step how.
I believe it’s one of the best beehiiv features, with many customization opportunities for content creators.
Navigate to Design → Website Builder → Custom pages (pick from the drop-down menu) → Custom Pages → Internal Page

In my opinion, it is one of the most frequently used features.
You can create pages on beehiiv to publish content, sell products, and promote your freebies.
In a way, beehiiv can replace a standard website you’d have to create otherwise.
It took me a few hours and a friendly chat with the beehiiv support team to understand how to create and customize a landing page with a subscribe form.
Here’s how you can do it:
- Create a subscribe form
- Create a customized page to download your product
- Embed the subscribe form
- Save the page
- Create a thank you page with a thank you message
- Create an automation that will send users a welcome email after the subscription
Here’s what the simplest landing page looks like on beehiiv, where I encourage users to download my case study:

Furthermore, I use a thank you page to promote other beehiiv creators and make money through boosts.

The first three recommendations are boosts, which means I’ll make money if my subscribers join other creators’ email lists.
Beehiiv often pays $1–$3 per subscriber, making it an excellent way to earn extra money online.
Alright, I’ve shown you how to create a subscribe form and a custom page on beehiiv.
What’s next?
The next step is to learn how to write a newsletter.
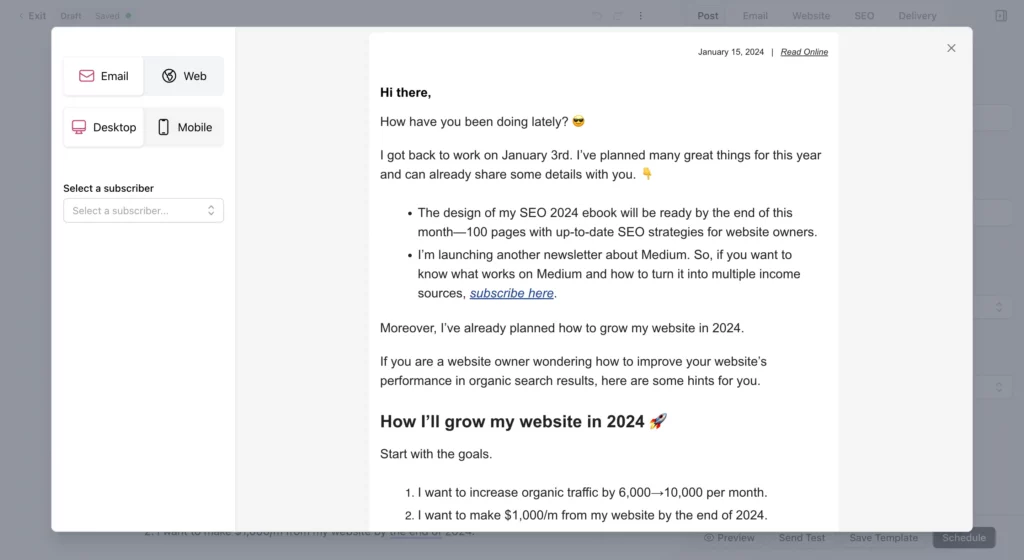
A big button, “Start writing,” in the top-right corner of the creator dashboard will redirect you to the content editor, where you can create a post, an email, or a beehiiv SEO optimized website page.
In the example below, I used a content editor to draft an email. It’s incredibly user-friendly.
The downside, though, is that it lacks options for email personalization, so all my subscribers receive a greeting that begins with “Hi there.”

You can use the beehiiv content editor to:
- Create and publish posts on your beehiiv website
- Create and send newsletters
- Publish newsletters on your beehiiv website
You can also use the content preview feature to see how your content will look after it is published or sent via email.

I believe beehiiv is a fantastic newsletter platform for anyone launching an online business. It offers many essential features at no cost, allowing content creators to “try out” the platform before committing to a paid plan.
Plus, beehiiv includes a range of features that can benefit both newcomers and experienced creators with large email lists.
beehiiv's monetization opportunities (1,000+ subscribers)
According to the Litmus guide, email drives an ROI of $36 for every dollar spent, which is higher than any other channel.
This is mindblowing information indicating the massive potential of newsletters for content creators!
Let me share a few proven-to-work methods for monetizing your email list and making money with beehiiv.
1. beehiiv Partner Program
The beehiiv Partner Program is one of the best ways to earn money beehiiv has made for content creators.
The logic is simple:
- Create an account with beehiiv
- Promote beehiiv among your target audience
- Earn 50% commission from every sale during the first year for referring new paid customers to beehiiv
I’ve made $5,108.28 from the beehiiv Partner Program.

I’ve been using my Medium blog and this post to spread the word about the platform, and the results look really promising!
Beehiiv pays your commissions directly to your PayPal account each month, but keep in mind that this is the only way to receive your affiliate earnings.
2. Boosts
Boosts is another way to grow your email list faster and create an additional revenue source.
For those looking to grow an email list faster, beehiiv offers an opportunity to promote your newsletter among thousands of qualified beehiiv newsletters to reach your target audience.
According to the beehiiv boosts page, the average cost of one active subscriber is $1.63.
If you want to monetize your newsletter on beehiiv, you can apply to boost other newsletters and get paid for every new subscriber. Please note you’ll have to set up a Stripe account to get your earnings.
Beehiiv’s boosts marketplace provides many opportunities for your consideration. If you believe you can help other creators grow their email lists, send an application and explain why your newsletter is a good fit.
You can send a maximum of 25 boost offers per month. However, beehiiv will only show up to 3 boosts at a time.
Besides making money by referring new subscribers, there’s one more boost type called “Earn per send.” It means you can also make money by featuring other creators’ newsletters in your newsletter. Some creators pay up to $1,000 per send!
Can you imagine making up four figures by sending just one sponsored newsletter? It’s possible with beehiiv boosts!

You can learn more about making money with Boosts in this video.
3. beehiiv Ad Network
The beehiiv ad network is a way for creators to connect with premium brands and earn revenue by featuring ads in their newsletters. The network matches brands with newsletters based on audience demographics and interests so that the right people see ads.
You must have more than 1,000 subscribers and be actively sending emails to join the beehiiv ad network.
Once approved, you’ll receive inbound ad opportunities from the beehiiv team. You can choose to accept or decline any ad, and you’ll be paid a portion of the ad revenue based on the number of clicks or views.
Here’s my experience with the beehiiv ad network.
When I joined beehiiv, I had 2,000+ subscribers. I’ve sent a few newsletters and set up my beehiiv newsletter.
I thought I’d need time to earn credibility on the platform before I’d get any offers from advertisers. Surprisingly, I was wrong!
By my third week on beehiiv, I received three sponsored ad requests!
Here’s what the ad request looks like on my dashboard.

In 2024, I ran 37 ads for various companies, including well-known brands like Hubspot.
Overall, I’ve made $632.02 from the beehiiv Ad Network by simply embedding the ad into my weekly newsletter.
The best-performing ad campaign made me $112, got 35 clicks, and had a 4.5% click-through rate.
It’s also worth mentioning that the ad was relevant to my audience. That’s why they actively responded to it.

It’s also worth noting that beehiiv regularly sends ad opportunities if you have over 1,000 subscribers and you keep your account active.
I’ve had record-breaking months with over 10 ad sponsorship requests from beehiiv.
On average, I get 3-5 requests monthly.
Occasionally, you’ll receive irrelevant ad offers or multiple sponsorship inquiries from the same company. It happened to me many times.
From my experience, I can say that irrelevant ads have obviously the worst performance since users aren’t interested in clicking on the ad.
Besides, if you run the same ad several times, you might get different results! For instance, Hubspot sent me a sponsorship request twice. The second time, I got almost twice as many clicks.
So, ensure to experiment with the copy and tone of voice to find what resonates with your audience.
4. Paid subscriptions
As an email newsletter platform, beehiiv offers content creators an opportunity to build a recurring revenue stream through paid subscriptions.
Beehiiv doesn’t charge any fees for paid newsletters, and they only take a 2.9% + $0.30 processing fee from Stripe, their payment processor.
With their platform, you can:
- Set up a paywall to protect your premium content
- Offer different pricing plans
- Offer monthly and yearly plans
- Create custom offers and free trials directly on the platform
- Track your subscription revenue
- Promote your paid newsletter
Here is how much you can earn from beehiiv paid subscriptions over a year if you have 100 paid subscribers paying $7/m.
The path toward monetizing an email list is not easy, even for established content creators. Therefore, I encourage you to try different monetization options to determine what works for you.

How much beehiiv costs
I hope you’ve found this honest overview helpful so far!
In this section, I’ll dive into the beehiiv pricing details.
While many features are available for free, the key functionalities, including monetization options, are available to users on the Scale, Max, and Enterprise plans.
To make it easier for you, I’ve put together a table outlining what each beehiiv pricing plan includes and which one might be the best fit for you.
Beehiiv also offers a customized plan for content creators and companies with over 100,000 subscribers.
If that applies to you and you’d like to learn more about what beehiiv can provide, you can inquire about the enterprise plan here.
| Launch: $0 | Scale: from $39 | Max: from $99 |
|---|---|---|
| Custom website | Everything from the Launch plan | Everything from the Launch and Scale plans |
| Custom domains | Ad networks | Remove beehiiv branding |
| Unlimited newsletters sends | Boost network | NewsletterXP course |
| Real-time email verification | Custom Sending Domain | Boosts |
| Campaign analytics | Premium subscriptions | Priority support |
| Real-time Email Verification | Email automations | Only $399 per month for 100,000 subscribers |
| Up to 2,500 subscribers | Access to beehiiv community | |
| Only $299 per month for 100,000 subscribers |
Unique beehiiv features worth knowing
Even though I’ve already covered a lot on how beehiiv works and how you can benefit from using it as a content creator, I’ve handpicked a few more features worth knowing.
These are unique features that make beehiiv stand out from other creator tools.
Audio newsletter
I think the sky is the limit for the beehiiv team since they continue to impress their users with new features while competitors can’t keep up.
With an audio newsletter, you can let your subscribers listen to your newsletters instead of reading them.
This feature is available by default, which means you don’t have to do anything to turn it on.
I’ll soon test it on my audience and share their feedback. Overall, this seems to be a helpful feature for busy people.

Newsletter mobile app
With beehiiv, your readers can install your custom app, add it to their home screen, and never miss another piece of content from you.
This is a new level of engagement with your target audience I haven’t seen other platforms offering.
To launch your app, simply toggle it on in your account here: Design → Website Builder → Settings → Mobile App.

Here’s what it looks like when you open a beehiiv newsletter on mobile.

"Pay what you want" subscription
beehiiv has a new feature called “Name Your Price,” which could be a game-changer for you if you send paid newsletters.
It lets subscribers decide how much they want to pay for premium content. This is a great way for content creators to earn income while giving their audience more flexibility.
I haven’t used it yet, but this might be a great additional revenue stream.
In total, beehiiv lets you offer multiple subscription plans, including:
- Monthly subscription
- Annual subscription
- One-time payment
- Name Your Price
beehiiv AI
Last year, beehiiv introduced its own suite of AI tools to help you streamline your content creation.
Here’s what you’ll find inside your beehiiv dashboard:
- AI Writing Assistant to create newsletters faster
- AI Text Tool to fix all possible grammar and spelling mistakes and autocomplete your sentences
- AI Image Tool to create unique images for your newsletters
- AI Translator to translate your content into Spanish, French, German, Italian, and Portuguese
It’s worth mentioning that beehiiv AI is only available for users on a Scale and Enterprise plan.
If you are interested in giving it a try, I recommend signing up for a 30-day free trial first.
FAQ
Have you already tried beehiiv? Feel free to share your experience and opinion about beehiiv in the comments below.
I’ve also collected frequently asked questions that people actively search for.
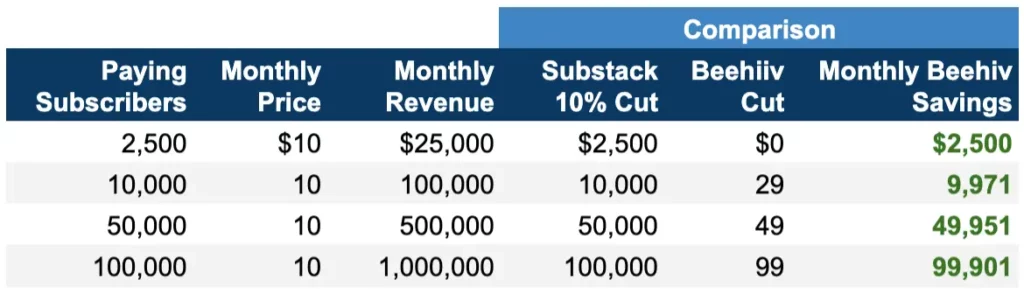
What is the difference between beehiiv and Substack?
beehiiv and Substack are two of the leading platforms for creating and sharing newsletters. They both come packed with features like email marketing, landing pages, and ways to monetize your content.
Exec Sum put together a handy table that compares the costs and benefits of beehiiv and Substack as your revenue grows.
It turns out that paying a flat fee might be more advantageous for you, especially as your earnings start to increase.
beehiiv vs. Convertkit
I’ve been using Kit (Convertkit) for three years, and I’ve really loved the platform.
Unlike beehiiv, Kit has a bunch of pre-built landing pages for different purposes that you can set up in just a few minutes.
For instance, they have templates for promoting freebies, ebooks, events, podcasts, and more.
On the flip side, beehiiv doesn’t have any templates available yet, so you’ll need to spend some time figuring out how to create your own landing pages for promoting your products.
That said, beehiiv does offer more customization options to make your newsletters and website look stunning. Plus, when it comes to monetization features, beehiiv definitely stands out.
With options like boosts and sponsored ads, I was able to make $940.32 in 2024.
While the beehiiv partner program made me $4,541.18 up until November 2024 without active promotion (just this beehiiv review and a few posts on my Medium blog).
Does beehiiv have newsletter templates?
Beehiiv doesn’t have pre-built newsletter templates. However, you can customize the newsletter background, fonts, and colors. Furthermore, they have a powerful newsletter embed feature, which lets you embed various elements and make your newsletters look nicer.
How to integrate beehiiv and WordPress?
It’s super easy to embed custom subscribe forms into WordPress and start collecting email addresses.
On most pages of my site (including this one), you’ll find a subscribe form right below the content.
Setting it up was simple: I grabbed a snippet of code from beehiiv and dropped it into my blog post using Elementor, the site builder I use with WordPress.
Plus, beehiiv has a handy feature to automatically publish your content on your website through RSS, using a free plugin.
You can learn more about WordPress and beehiiv integration here.
If you are interested in starting a newsletter, register for a 30-day free trial and then use my code BEEHIIV2025 to get 20% off your first 3 months! 🚀
.png)


